Loading... Please wait...
Recent Posts
Categories
Popular Brands
our newsletter
- Home
- Cadillac
- Cadillac Deville
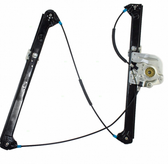
- Right (Passenger) Front Deville Window Regulator DEVILLE/DTS/DHS
 Front 2000-20005 Window Regulator")
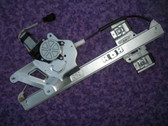
Right (Passenger) Front Deville Window Regulator DEVILLE/DTS/DHS
Product Description
For the 2000-2011 Cadillac Deville, DTS, AND DHS. This will fit the Right (Passenger) FRONT. Installation instruction photos and Videos at www.devillewindowregulators.com. DOES NOT include the motor but this in one time you do NOT want to replace the motor. The original GM Motor is made in Mexico and almost never wears out. The replacement motors are made in Taiwan or China and will not provide the same quality. All parts have a no hassle 30 day return policy. You may return the part anytime within 30 days even after you have installed it.
Product Videos
-
 00-11 Deville window regulator Replacement & Repair Left Fronthttp://www.upanddownmainstreet.com/cadillac-deville/ $5 off i...


Warranty Information
30 Day refund for any reason.
Find Similar Products by Category
Product Reviews
Previous | Showing reviews 31-40 of 49 | Next
-
Great product. Awesome price.

Posted by Bob Rhoades on 29th Sep 2014
This is a quality product. I could not find a better price. I am very happy.
-
Perfect Fit
Posted by Unknown on 30th Aug 2014
I can't believe how easy it was thanks to the video that was posted by you. It helped me save over $500 by doing it myself ( since both regulators had to be replaced). Thanks a lot!!! I will most definitely return if needed, thanks again.
-
Scott is the man !!!!
Posted by Jay on 8th Aug 2014
Sliced my thumb on a sharp part . Overall , thanks to Scott and his video , got it done in an hour or so . Make sure you have a thin walled 10 mm socket . A thick one will give you problems . Really can't say how much help Scott was .
Just wish I had his help back in the 70's & 80's when there was no internet . I cussed a little , but nothing like I normally do .
Scott , YOU ARE THE MAN !!!!!!
-
you won't believe how easy it is to install

Posted by Unknown on 29th Jul 2014
the product is the product. It fits. It works. The real news is how easy it was to install following the step-by-step instructions accessible on youtube. In fact, I paid a few dollars more for the part because Up and Down provided to how-to tutorial.
-
Wicked good !!!!
Posted by Jay on 29th Jul 2014
I'm not a professional mechanic , but I've wrenched on everything from tractors to Indycars . Drivetrains , electrical , cooling , fuel delivery , etc .
The one thing that has always scared me is interior electromechanical parts . Seems there's never enough room , weird connections and just overall doubt of my skillsets .
Scott's video made it so easy , I'm thinking of applying for a job at the local GM dealer as long as I can get a hotline to Scott . Had a couple minor issues , but called him up , he answered personally , gave me the proper solutions and "Zowie" as he says in the video , DONE !!!
I feel like a slacker cause he got it done in 10 mins.
Took me like 45 , but I had 3 phone calls and was having a Sam Adams .
Caution : sliced my thumb pretty good on something sharp so take caution .
Also use whatever logic before you start .
On new assembly , loosen nuts so glass will fit into grippers easily . Then tighten as directed . Just don't get in a bigass hurry , cause you'll just piss yourself off .
He made it easy for a reason !
Scott is the man !
-
Wicked good !!!!
Posted by Jay McDowell on 29th Jul 2014
I'm not a professional mechanic , but I've wrenched on everything from tractors to Indycars . Drivetrains , electrical , cooling , fuel delivery , etc .
The one thing that has always scared me is interior electromechanical parts . Seems there's never enough room , weird connections and just overall doubt of my skillsets .
Scott's video made it so easy , I'm thinking of applying for a job at the local GM dealer as long as I can get a hotline to Scott . Had a couple minor issues , but called him up , he answered personally , gave me the proper solutions and "Zowie" as he says in the video , DONE !!!
I feel like a slacker cause he got it done in 10 mins.
Took me like 45 , but I had 3 phone calls and was having a Sam Adams .
Caution : sliced my thumb pretty good on something sharp so take caution .
Also use whatever logic before you start .
On new assembly , loosen nuts so glass will fit into grippers easily . Then tighten as directed . Just don't get in a bigass hurry , cause you'll just piss yourself off .
He made it easy for a reason !
Scott is the man !
-
Deville Regulator simple to replace
Posted by Rick on 23rd Jul 2014
I found the video as a very big help and after ordering the part, so simple to replace. Works as good as new. Saved a bundle of cash, thanks !
-
2003 Cadillac DTS Front Passenger Regulator
Posted by Unknown on 4th Jul 2014
Part came in really fast and price was good. After watching your video, I installed regulator in 30 minutes, no problems. Saved a few hundred in a repair bill. Thanks for posting the video, I would have been lost without seeing you do it.
-
Great
Posted by Binky on 17th Jun 2014
The YouTube video and website for this paet turned out to be a lifesaver for. The part was affordable, cheapest rate I was quoted, and it came 2 to 3 days later. I followed the YouTube video on installation and saved myself a couole hundred bucks!
-
Deville regulator
Posted by Robert on 30th Apr 2014
Received the regular after a few days and over the weekend I installed it. I bought a plastic door trim remover to keep from scratching the paint when removing the door panel. Looked like a small fat trim bar. I could have used my metal one with a piece of duct tape around it just as well. The panel came off real easily, just like the video. Watch very carefully which way the metal clips face when you take the panel off. You'll put the clips back on before putting the panel back on. They can go on two ways. Pay attention. One fell off but the other was on so I knew which way to put them back. Removing the regulator was easy. Tip when putting it back in is to grab the bar that moves (with the brackets to hold the window facing you) and just push it all the way down before putting the motor on it. If you don't you will not be able to get it in the hole in the door. Install the regulator then follow the directions just like the video. The ONLY issue I had was getting the door panel to line up. Those metal clips must face the right way to line up. Also, there are long plastic guides on the door panel that go into a a guide hole on the door. Pay attention and line them up correctly. Then just push them in, hitting the door panel with your palm to get them to snap in. Really not hard. Took me about 75 minutes. If I do another one I could do it in 30 minutes easily. I had the drivers side and the rear passenger fail which cost me over 425.00 each to repair at the Cadillac dealership. I did this repair for 70.00 including the trim kit I bought. Thank you for the video and the part! One more window to fail and I've got them all replaced!